Initial State Machine
Create an initial AWS Step Functions state machine
Recall that after the riders upload their photo, the first thing we need do in our processing pipeline is to run a face detection algorithm on it to verify that it has a recognizable face in the photo (zero or multiple faces in the photo doesn’t help unicorns recognize the rider) and the face is not wearing sunglasses (makes it harder to identify the rider). If these validations fail, we will notify the user and end the workflow.
In the end of this section, your state machine should resemble the following:

The CloudFormation template we instantiated earlier provides some of the core building blocks for this process. First, an AWS Lambda function that implements the validation check by leveraging the Amazon Rekognition deep-learning based image analysis API. Look in the “Outputs” section for FaceDetectionFunctionArn for the ARN of the Lambda function that implements this part of the process. Additionally, when validations fail, we can use the deployed the Amazon SNS topic, found in the NotifyMeArn value of the “Outputs” section of the CloudFormation template, to send a notification to the user. Using this SNS topic, we can inform the user of the failure so they can try to upload a different photo.
With these two resource identifiers, Now you can create an AWS Step Functions state machine with the initial face detection step. To simplify this process, we also created a blank AWS Step Function to build from.
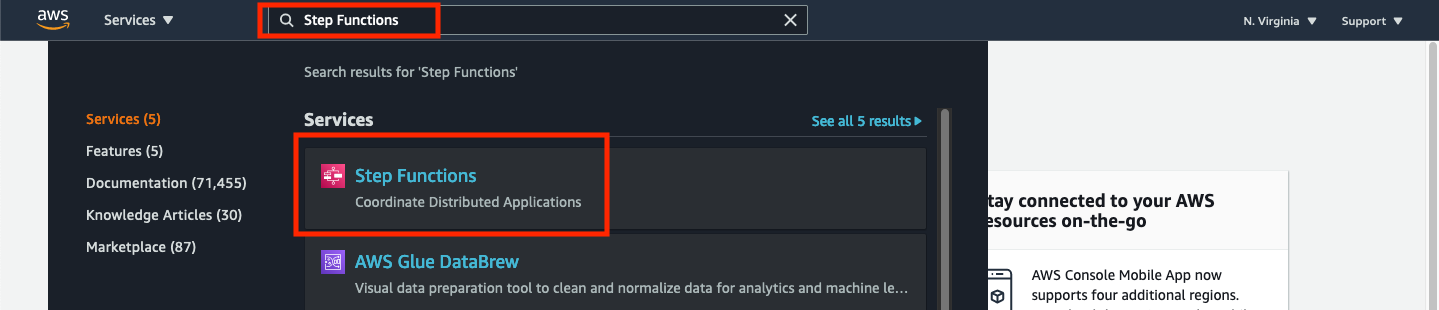
➡️ Step 1: Navigate to the Step Functions dashboard.
From the AWS Management Console, type “Step Functions” in the search field at the top of the window and select Step Functions from the list of services.
➡️ Step 2: Edit the RiderPhotoProcessing state machine.
On the “Step Functions State machines” page You should see a list of available state machines. If your CloudFormation stack was launched successfully, you should see at one state machine named RiderPhotoProcessing.
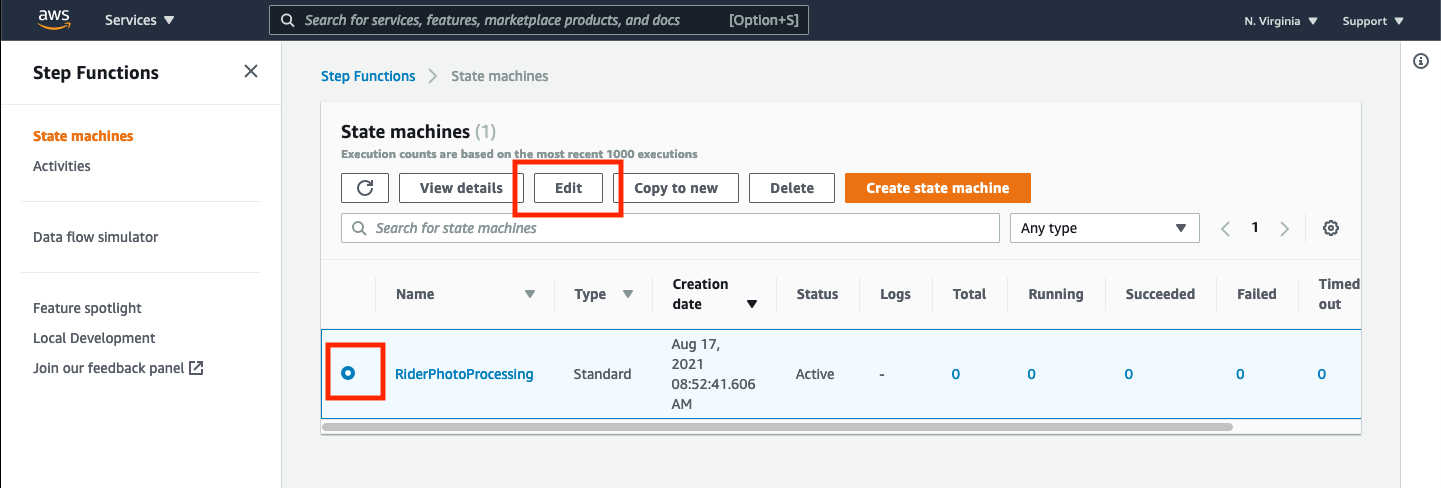
Click the radio button next to the RiderPhotoProcessing state machine and click the Edit button.
➡️ Step 3: Learn the basics of “Workflow Studio”. You should see a visual representation of the boilerplate workflow as shown below. For this workshop, we’re going to use the Workflow Studio to build out our state machine. Click the Workflow Studio button in the top-right corner of the state machine diagram.
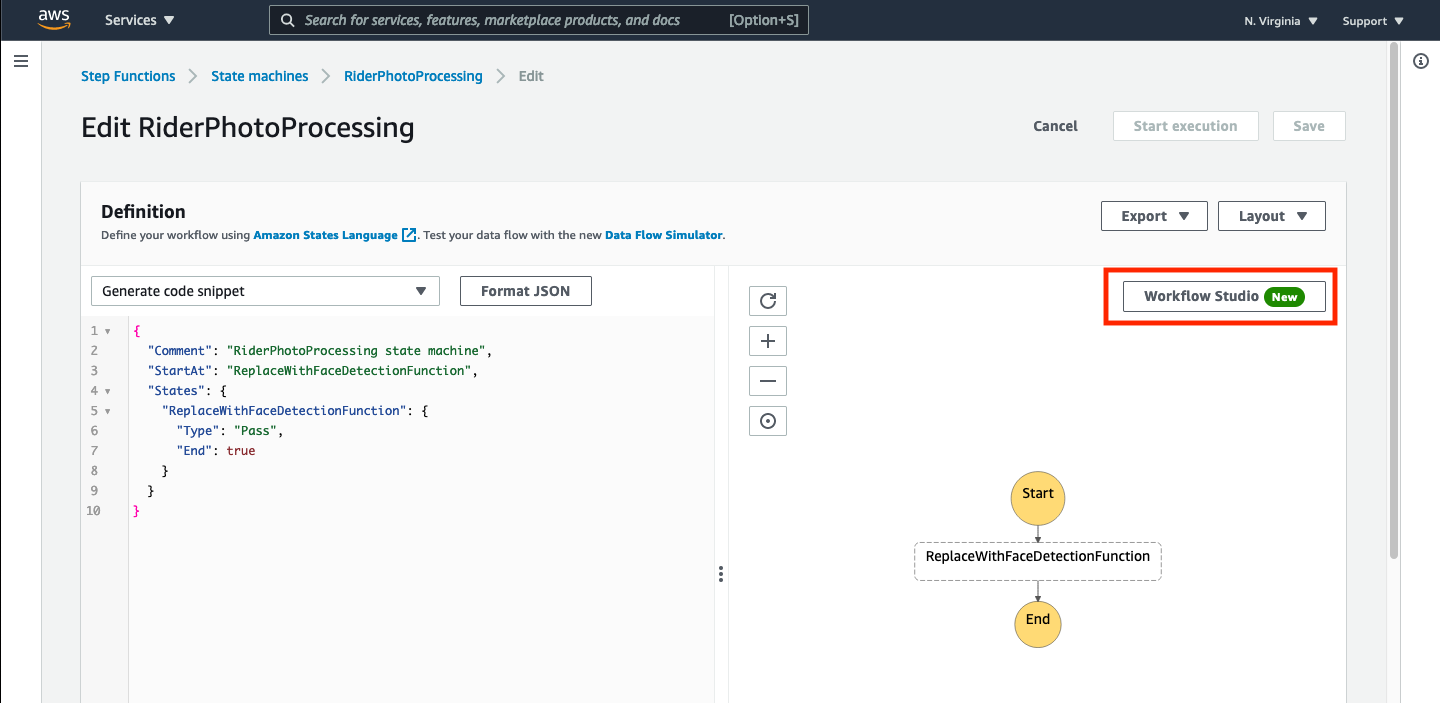
This will open the state machine in a visual drag-and-drop builder that minimizes the amount of JSON coding needed to use AWS Step Functions.
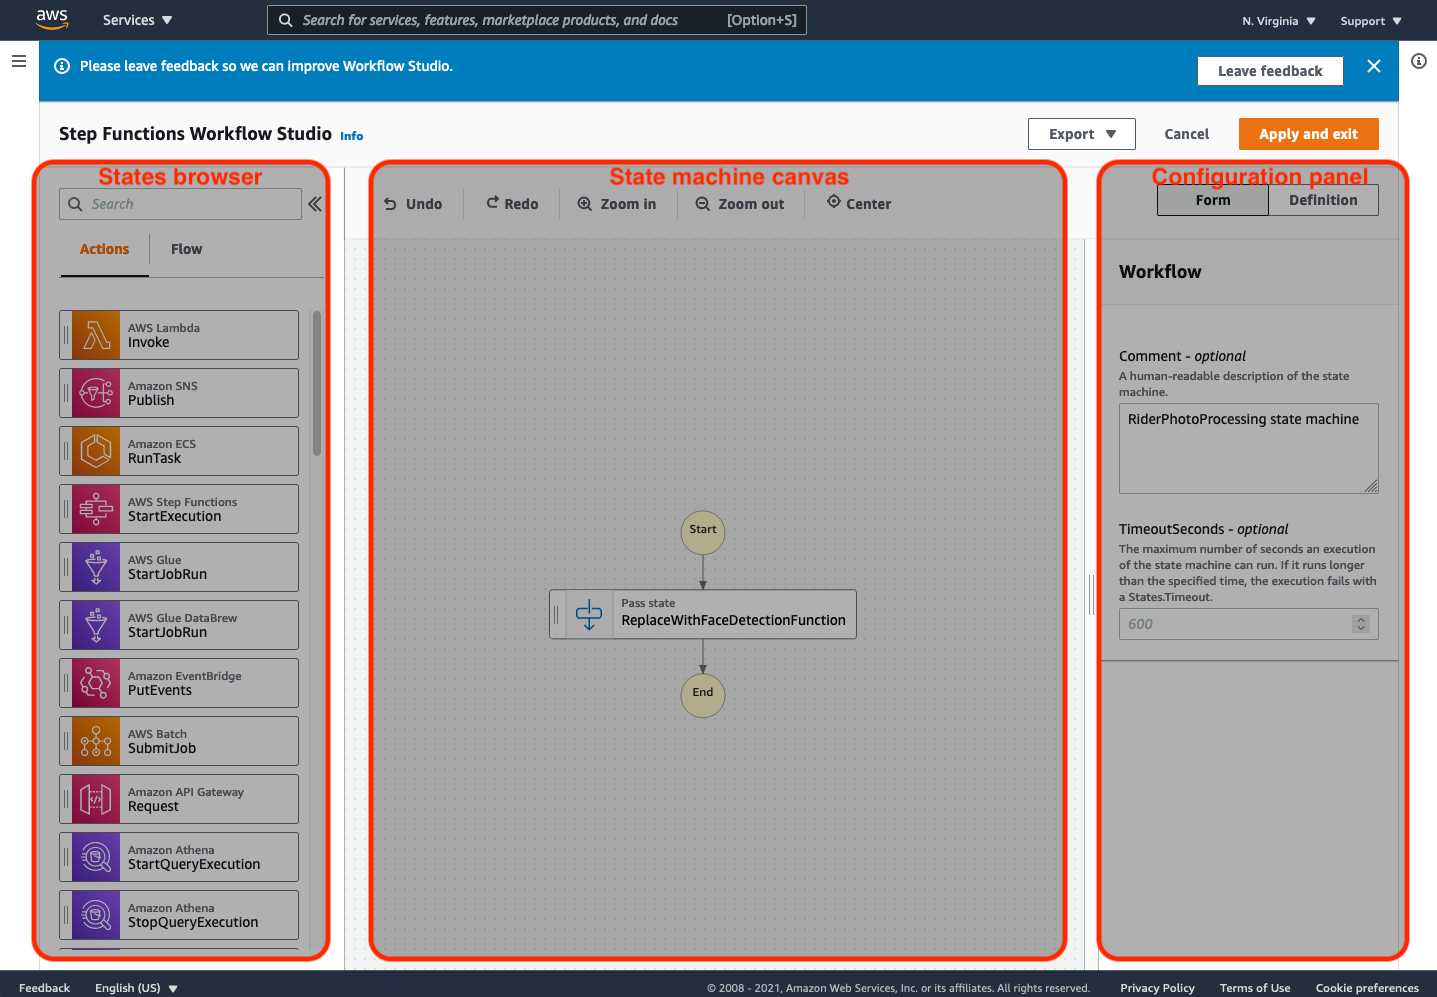
There are three primary sections of this window to be concerned with:
- “States browser”: On the left side of the window is the “States browser” containing a list of available states that can be dragged onto the state machine.
- “State machine canvas”: In the center of the window is the visual representation of the state machine. This portion is interactive, allowing you to click on states within the state machine, or act as a target for dragging states from the “State browser.” You can also control the display of this view by using the buttons along the top to zoom or center the state machine.
- “Configuration panel”: To the right of the “State Machine canvas” is a panel that allows you to configure, or view the definition of either the state machine workflow, or any state selected in the “State machine canvas”.
➡️ Step 4: Remove the placeholder state.
Click on the ReplaceWithFaceDetectionFunction state in the “State Machine canvas” and delete it by either pressing the delete key on your keyboard, or by pressing the Delete state button on the configuration panel. This will remove the default state that was configured to be in the state machine as a placeholder.
➡️ Step 5: Add a Lambda function invocation state.
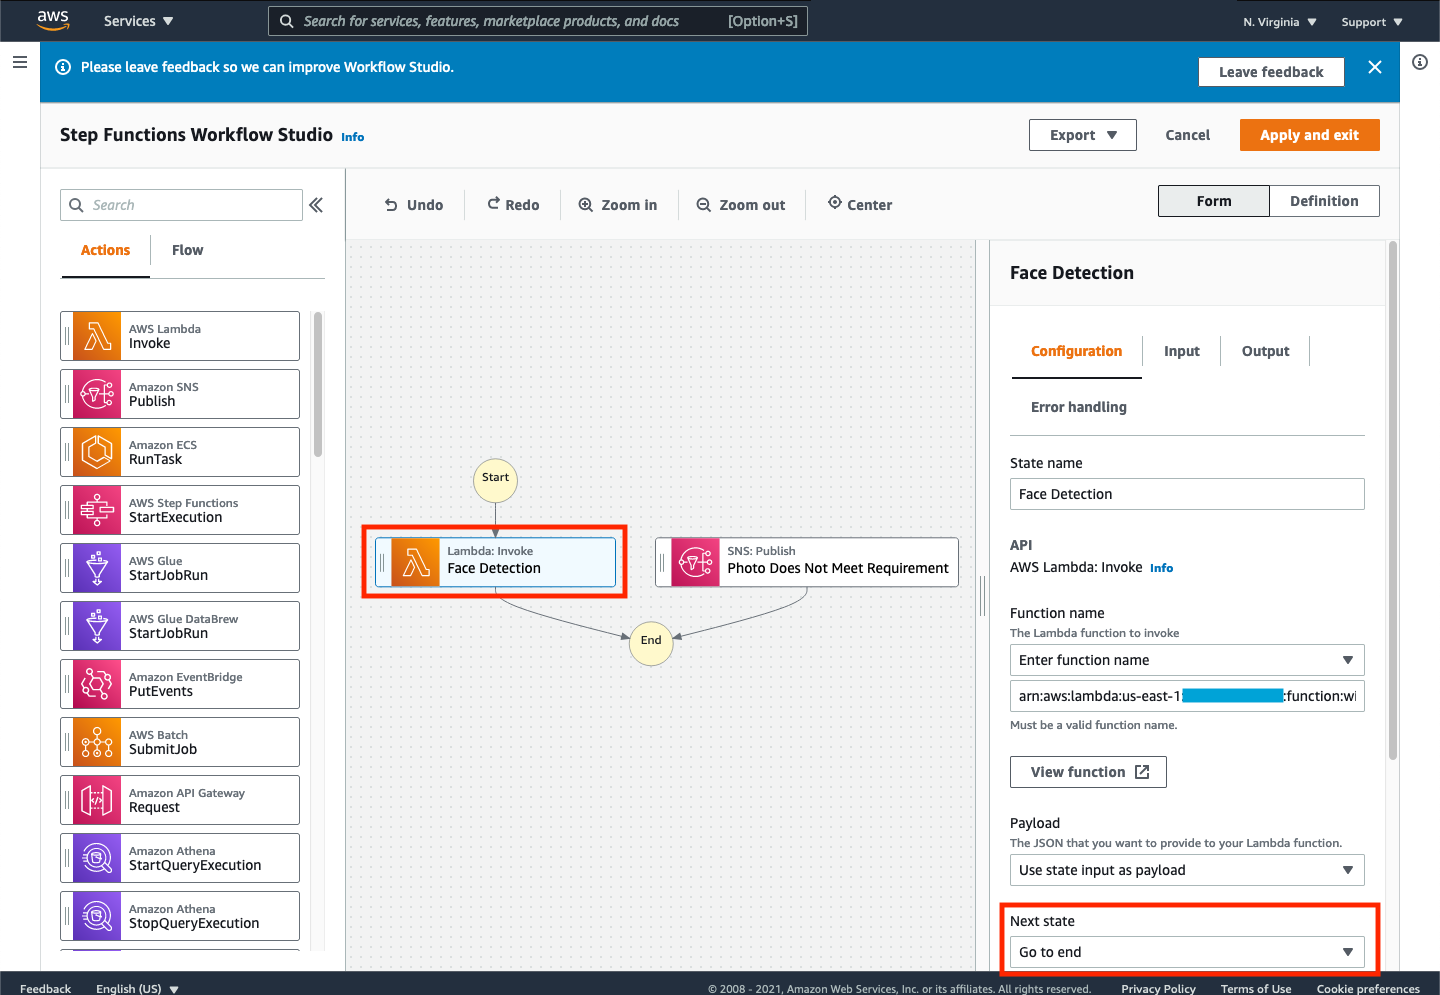
Drag the AWS Lambda Invoke action from the “States browser” and drop it on the “State machine canvas” between the Start and End states. When done, you should see that the “Configuration panel” has changed to allow configuration of the “Lambda Invoke” step as shown below.
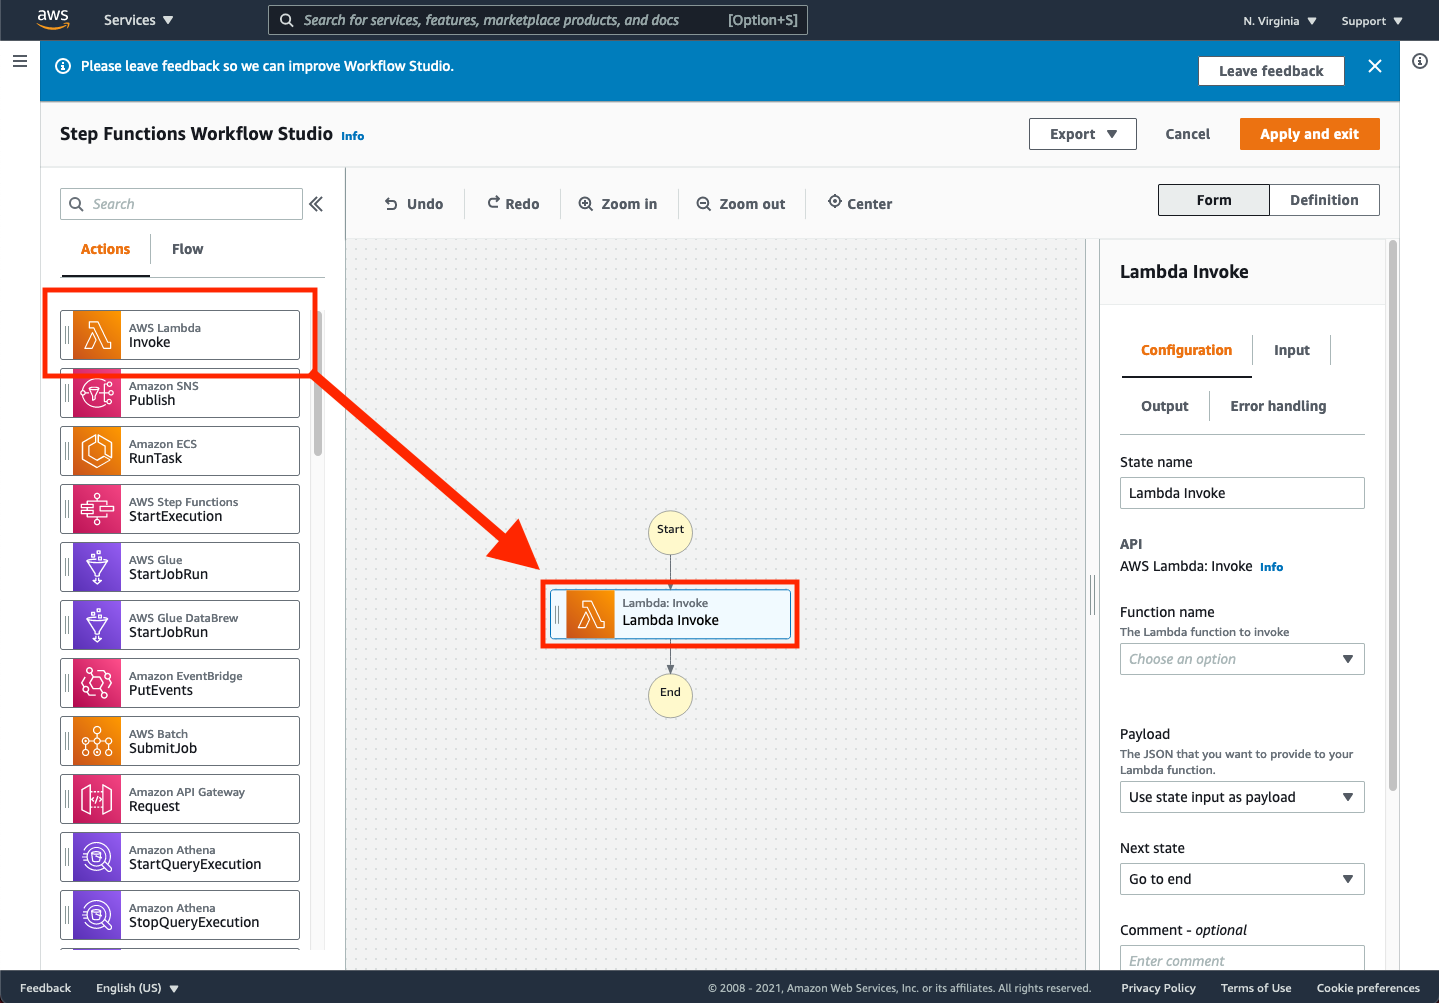
➡️ Step 6: Configure the state options.
In the “Configuration panel”, click the Configuration tab. First, change the state name to Face Detection. Then, in the drop-down control for Function Name, select the AWS Lambda function that will be called when this step is reached in the state machine. For this lab, you can simply choose the face detection function created by the CloudFormation template. This should be named something similar to wildrydes-step-module-resour-FaceDetectionFunction-XXXXXXXXXXX:$Latest
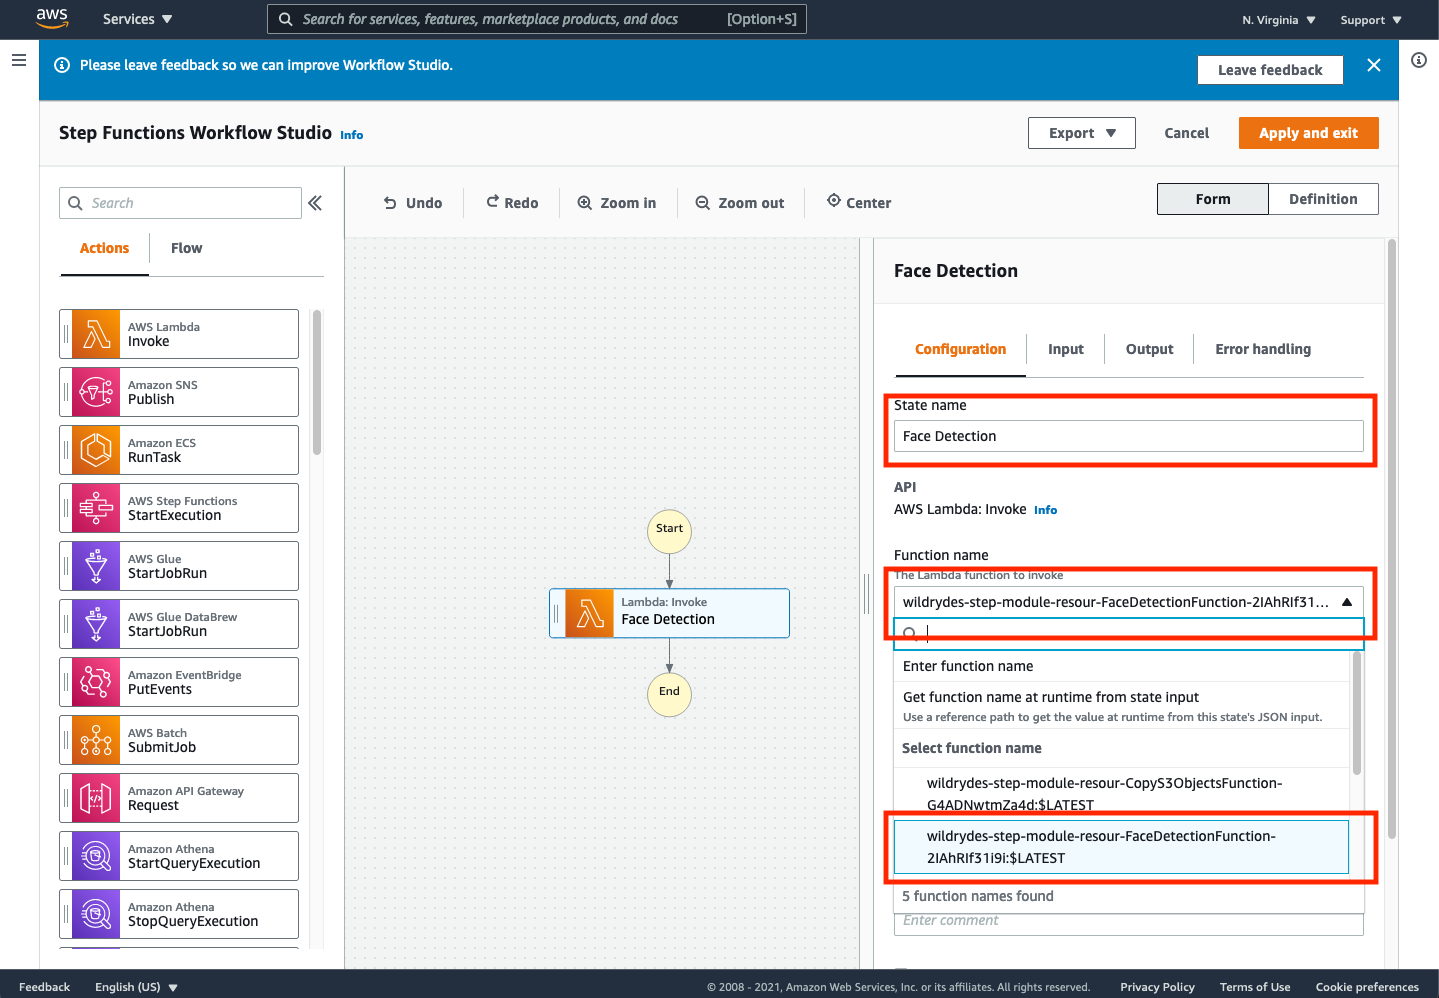
The CloudFormation template will deploy 5 Lambda functions. Be sure to select the one beginning with wildrydes-step-module-resour-FaceDetectionFunction-. If you choose a different one, you will experience errors with the rest of this section.
The purpose of this Lambda function is to simply take a user_id, an s3 bucket, and a file name, and determine if there is a face detected in the photo in that file. If there is no face, or there’s a face with sunglasses (or some other obstruction), the Lambda function will throw an error. Before we configure what we should do with the output of this function, let’s define a way to send the user an email if there’s an error.
➡️ Step 7: Add a notification state.
To send emails when errors occur, we will leverage the Amazon SNS topic we subscribed to when we launched the CloudFormation stack. To include this topic in the state machine, click and drag the Amazon SNS Publish action onto the canvas directly below the Face Detection Lambda function.
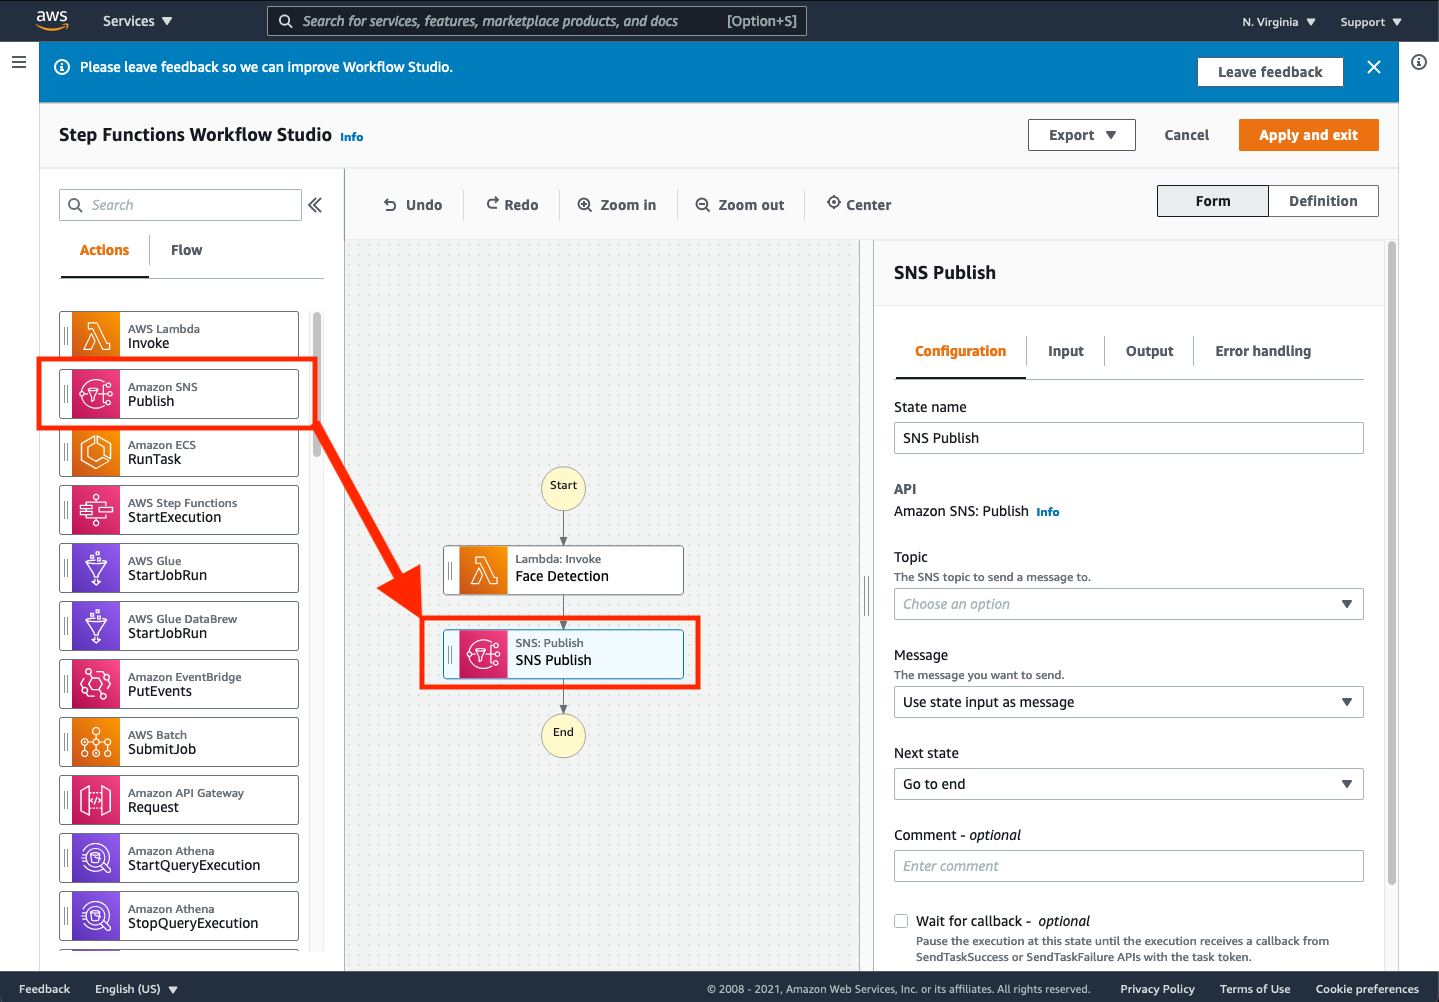
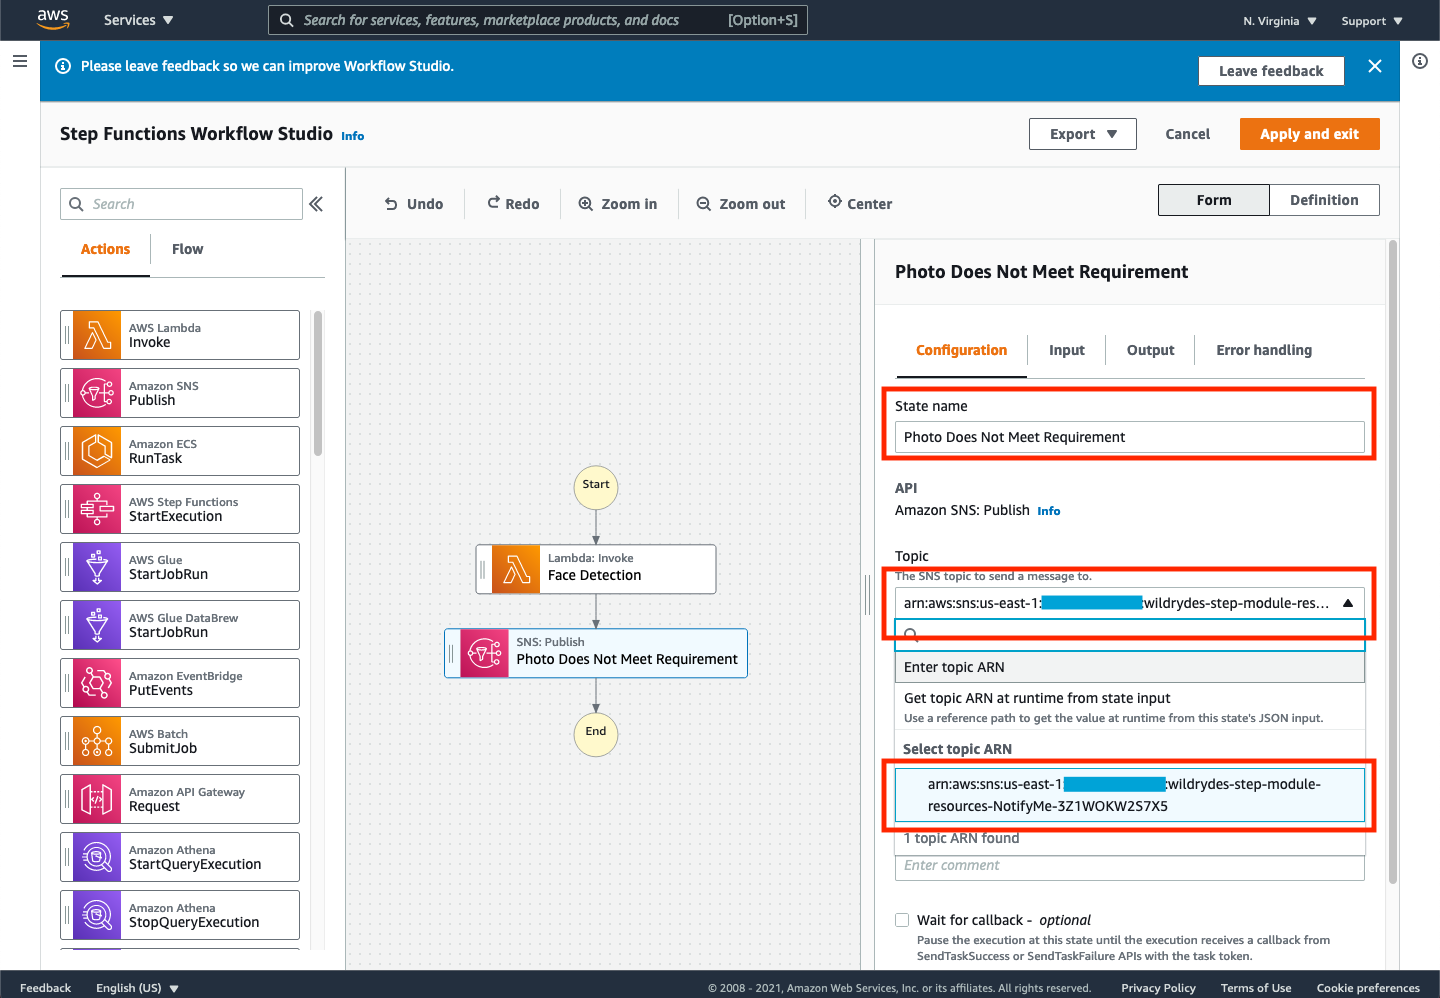
➡️ Step 8: Change the settings for the SNS.
Change the name of the SNS Publish state to be Photo Does Not Meet Requirement, and choose the topic that was created by the CloudFormation template launched earlier (arn:aws:sns:<region>:XXXXXX:wildrydes-step-module-resources-NotifyMe-YYYYYYY).
As configured now, every face detection invocation would send an email notification with the output of the Lambda function. However, we only want to send emails when the photo doesn’t meet the intended requirements. Let’s change this state machine to handle this need.
➡️ Step 9: Reroute output of the Lambda function.
Select the Face Detection step, and choose the Configuration tab in the “Definition view”. In the “Next State” drop-down, select the Go to end option. Your state machine should look like the following:
Note, If this state machine was executed, the SNS topic state would be bypassed, and never called. Finally, let’s add the input of the Face Detection Lambda function to it’s output for use later in this workshop. Choose the Output tab in the “Configuration panel” and click the check box next to Add original input to output using ResultPath. Choose the option to Combine original input with result and use $.detectedFaceDetails as the JSONPath value. Be sure to remove the check next to the other two options (Transform result with ResultSelector and Filter output with OutputPath)
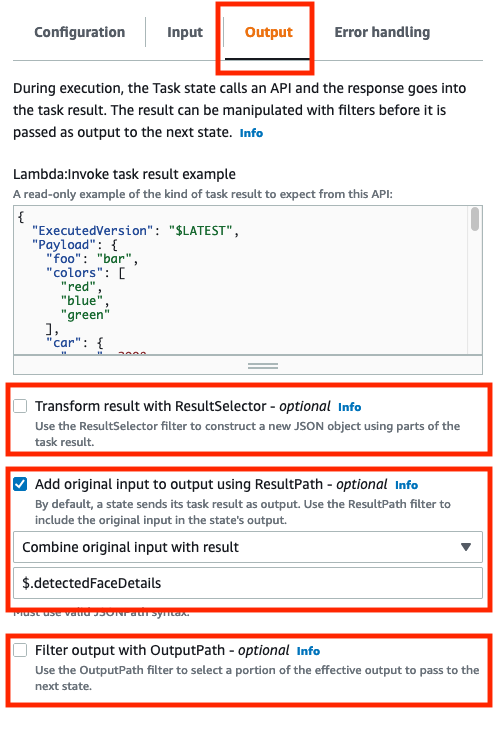
Make sure that ONLY the Add original input to output using ResultPath option is chosen. If either of the other two check boxes are selected, you will likely receive a failure when executing the state machine.
➡️ Step 10: Add an error handler.
Next, let’s configure a message to be sent only when the face detection Lambda function emits an exception. With the Face Detection state selected, click on the Error handling tab. Click the + Add new catcher button and configure Catcher #1 to have the following details:
- Errors: Add two error types to catch. Type
PhotoDoesNotMeetRequirementErrorand press Enter, TypeInvalidS3ObjectExceptionand press Enter - Fallback state: Select Photo Does Not Meet Requirement from the drop-down list
- ResultPath: Enter
$.errorInfo
The results of these configuration options should result in your state machine looking similar to the following:

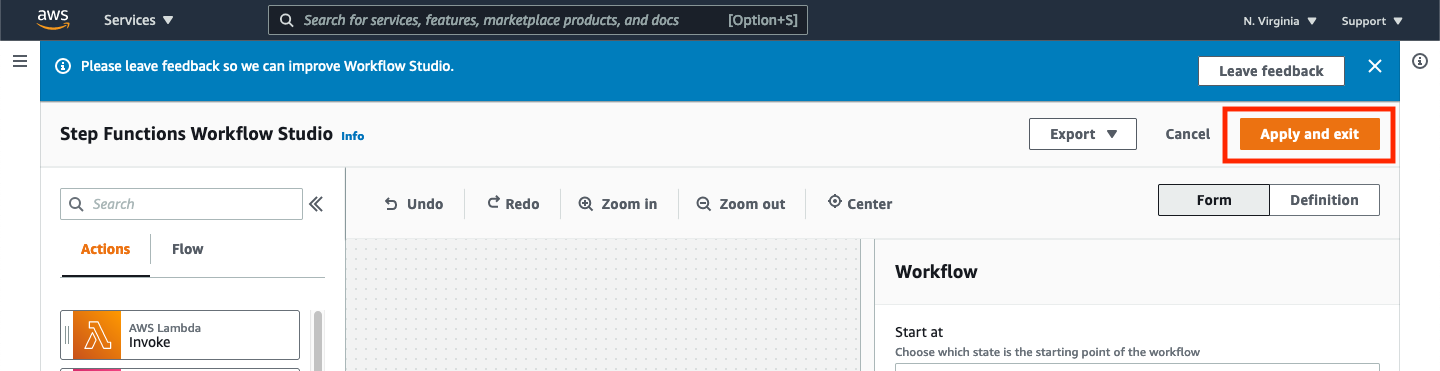
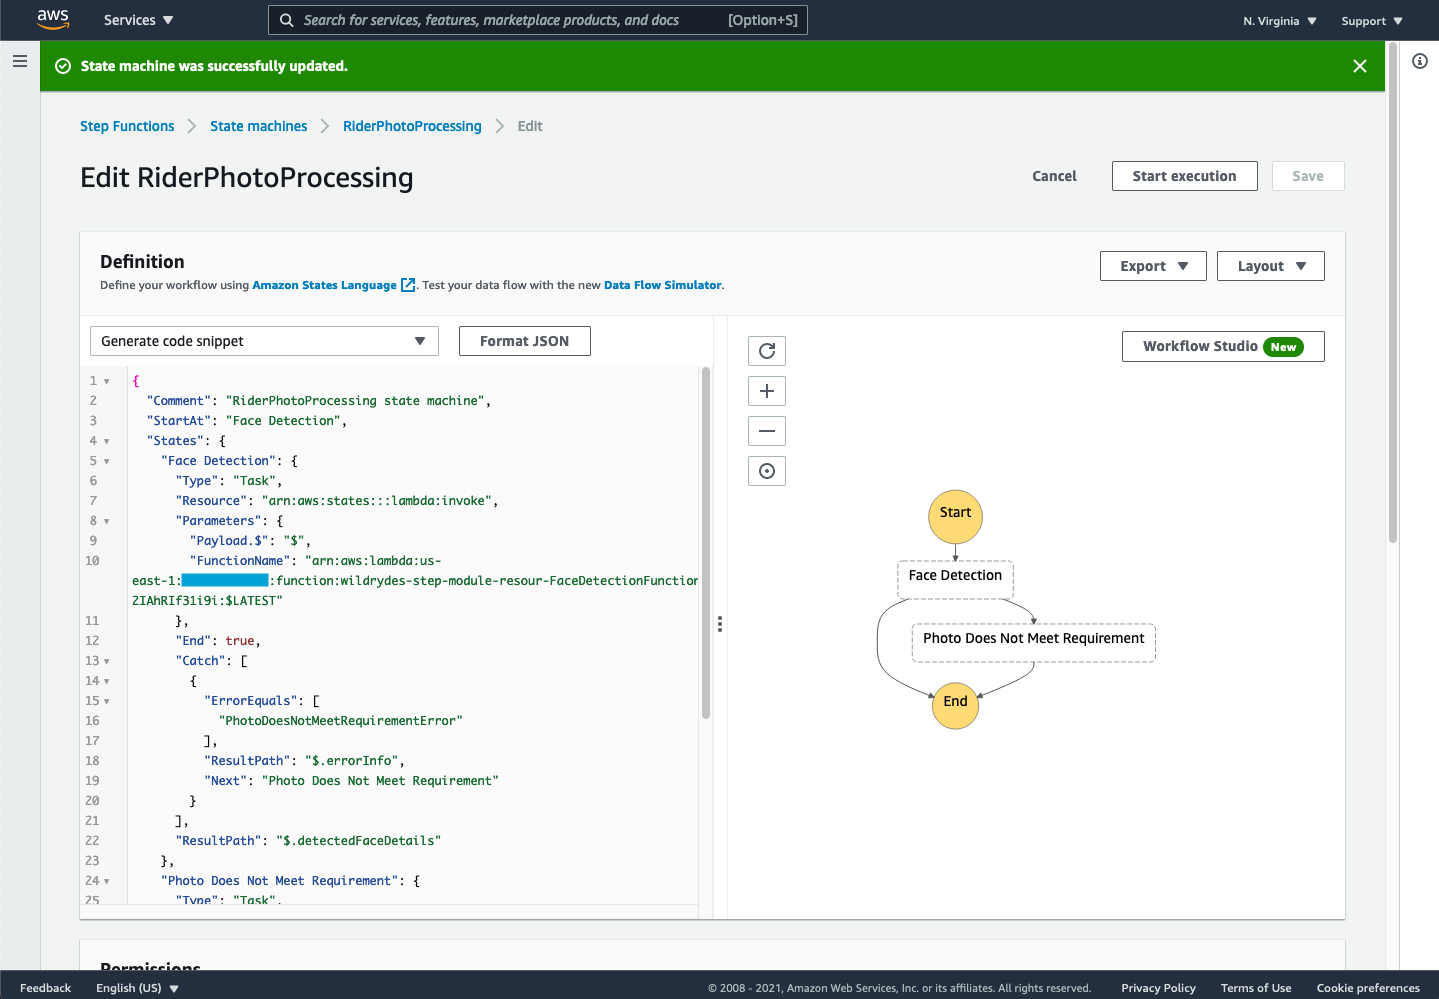
➡️ Step 11: Save the changes.
Click Apply and exit in the top right of the window to apply all changes and return to the state machine definition page.
To save the changes you made, you must also click the Save button in the top right of the state machine definition page.
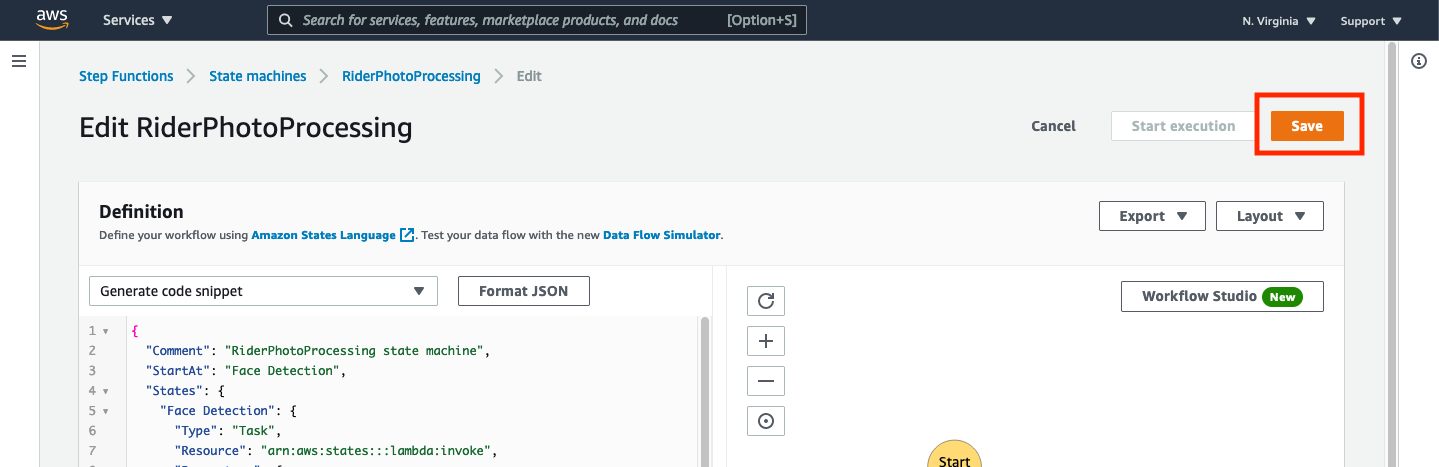
Saving changes to the state machine made using the Workflow Studio interface requires both applying the changes (to leave the Workflow Studio interface) and pressing the Save button once you have exited the workflow interface. If you fail to do either of these steps, the changes made to the state machine will not be saved.
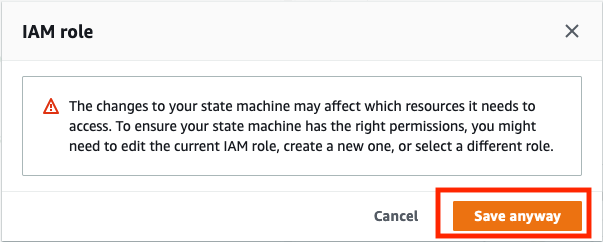
You may get an alert dialog when saving informing you that your changes may affect the resources the state machine needs to access. Click Save anyway.
You should get a confirmation that your state machine was successfully saved and the result should look like the following:
Testing our implementation
Now that we have built the inital state machine, let’s test our implementation by executing it with some sample input. Below are four images that you can use in testing:
 1_happy_face.jpg |
 2_sunglass_face.jpg |
 3_multiple_faces.jpg |
 4_no_face.jpg |
Based on our requirements that only photos with a single recognizable person should be allowed to be submitted, only the 1_happy_face.jpg image should be accepted by our state machine (i.e., not send an SNS notification that “Photo Does Not Meet Requirement”). We can test these requirements by running an execution of the state machine and providing sample input.
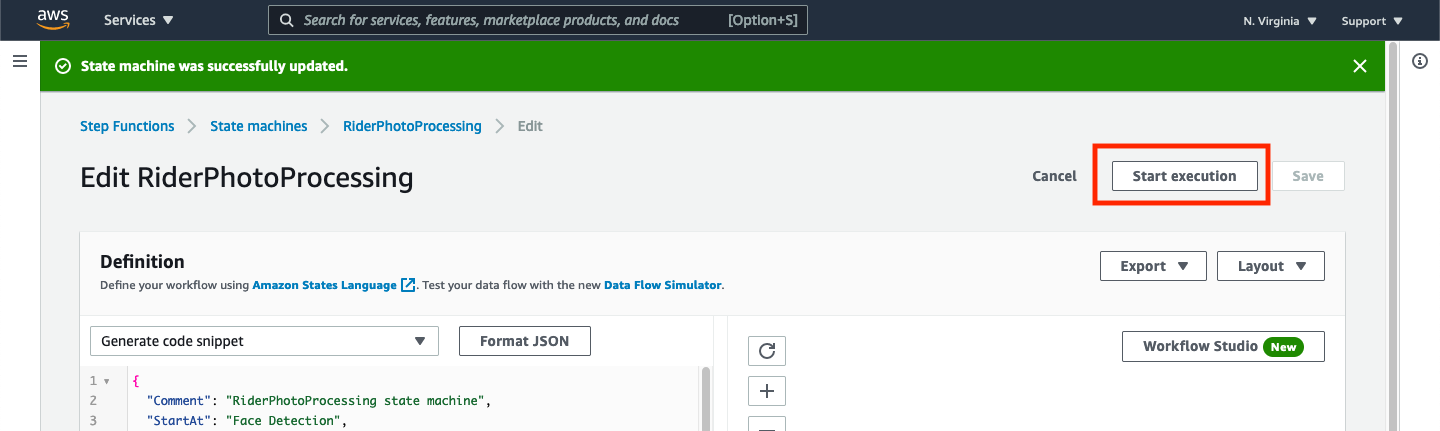
➡️ Step 12: Start an execution of the state machine.
Return to the AWS Console where you left off, you can click the Start execution button in the top left of the screen.
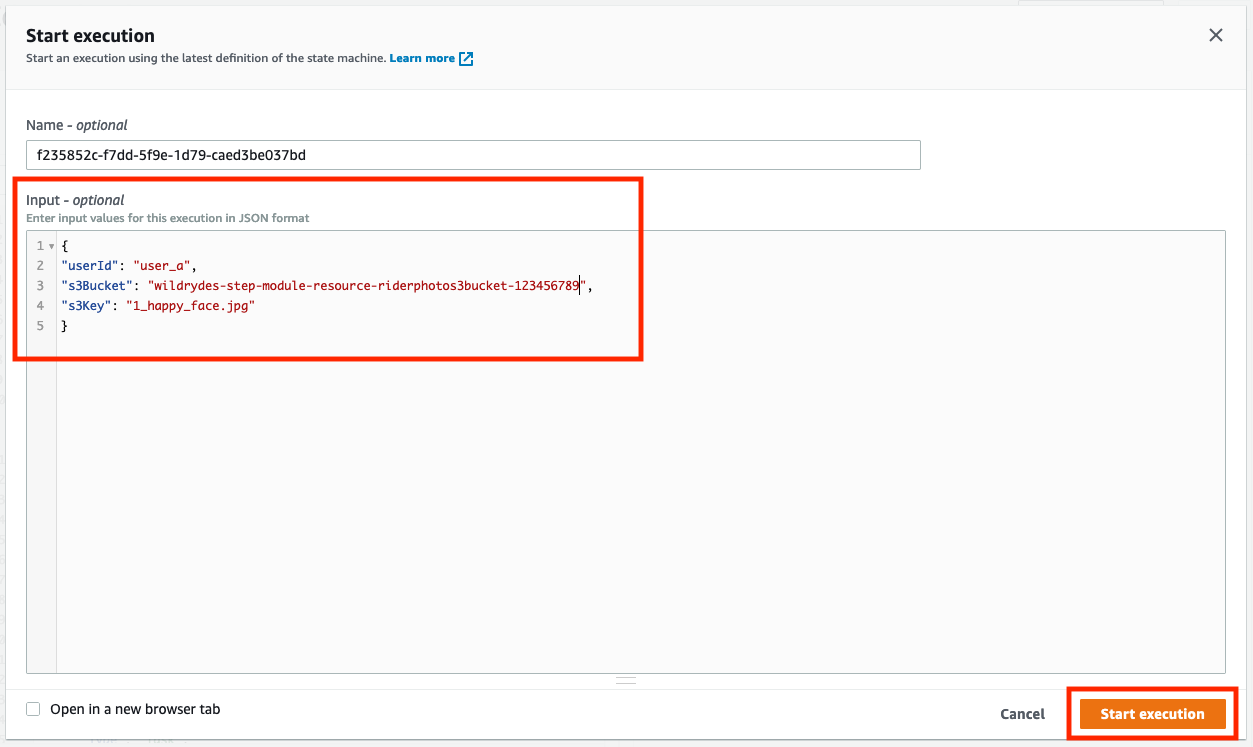
This will open a dialog where you can put your input data. For the input data, copy in the following JSON.
{
"userId": "user_a",
"s3Bucket": "REPLACE_WITH_YOUR_BUCKET_NAME",
"s3Key": "1_happy_face.jpg"
}
Paste it into the input field and make sure to substitute the REPLACE_WITH_YOUR_BUCKET_NAME with the value of the RiderPhotoS3Bucket value of the output from the CloudFormation stack. Then press Start execution to begin the execution of your step function state machine.
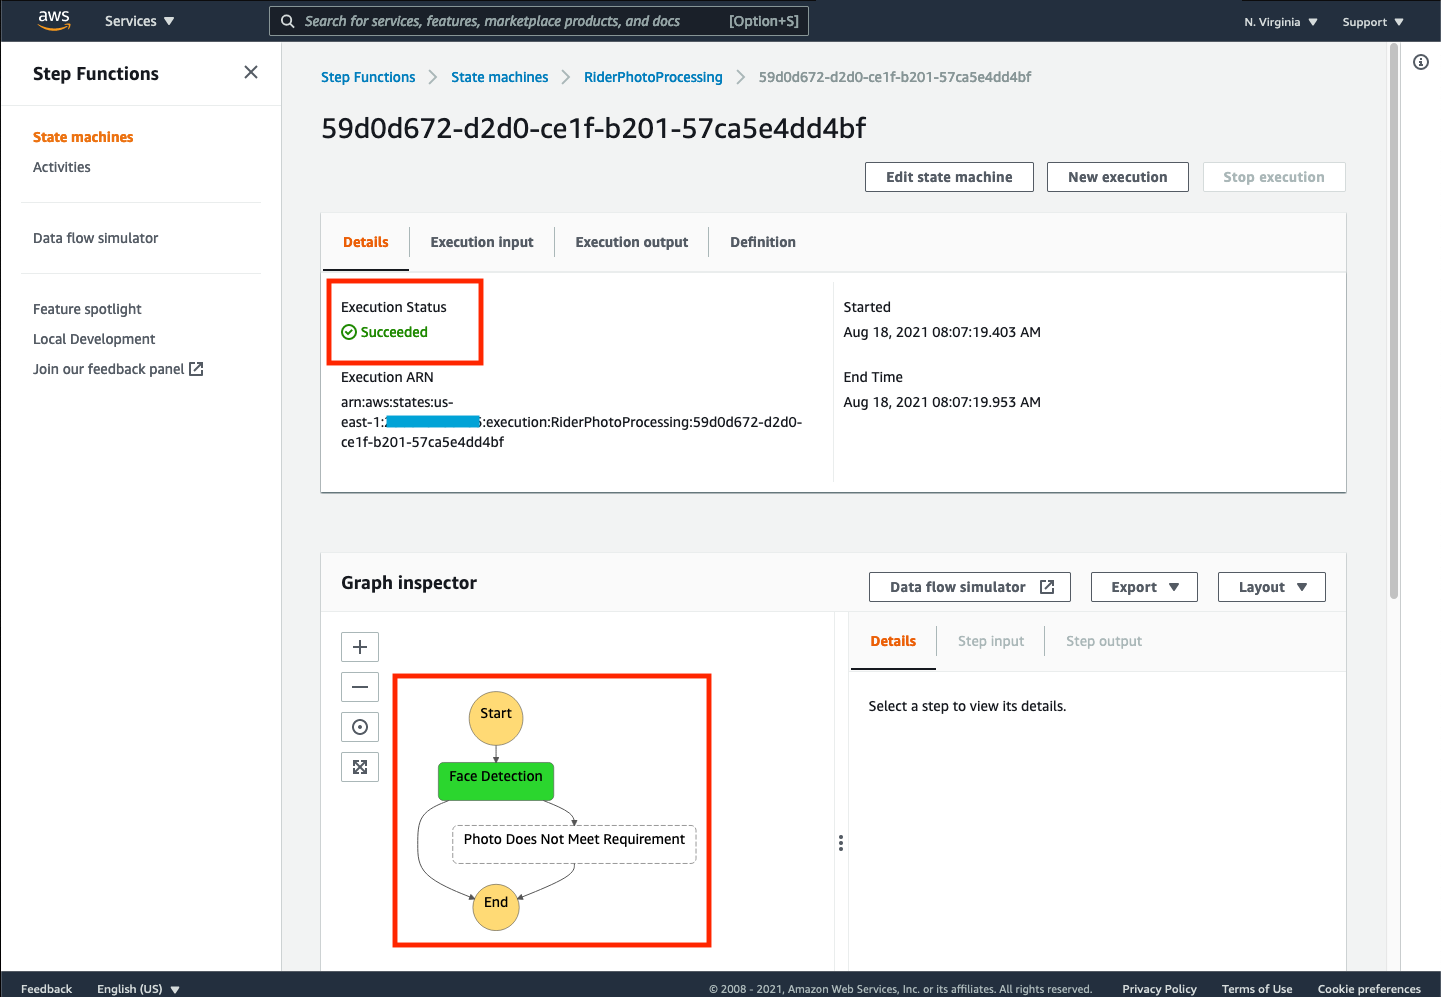
If things go well, you should see an execution status of Succeeded and the graph inspector should have a green Face Detection state and a dashed line around the Photo Does Not Meet Requirement state (since it was not executed due to a valid image submission).
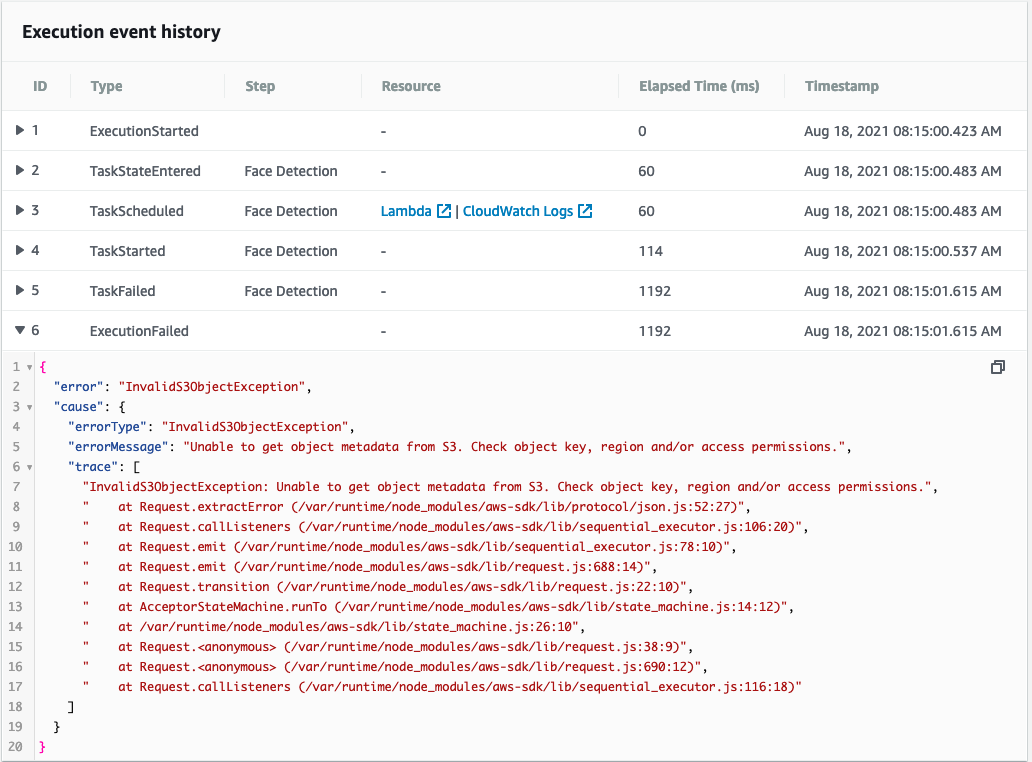
If you encounter an error, you can scroll down to the Execution event history on that page to examine the results of each transition through the state machine. Error messages will be found for each state that failed by clicking on the disclosure triangle next to the failed execution state. For example, below is a typical message that can occur if you mistyped your S3 bucket name for input to the execution.
➡️ Step 13: Run multiple executions to test the provided sample images.
Repeat this process for each of the sample images by replacing the value of your input for the s3Key to have one of the other images (2_sunglass_face.jpg,3_multiple_faces.jpg,or 4_no_face.jpg) similar to the following:
{
"userId": "user_a",
"s3Bucket": "REPLACE_WITH_YOUR_BUCKET_NAME",
"s3Key": "2_sunglass_face.jpg"
}
Note how the status of the state machine execution changes for each input. Did the state machine always succeed? Did you receive an email for each execution?
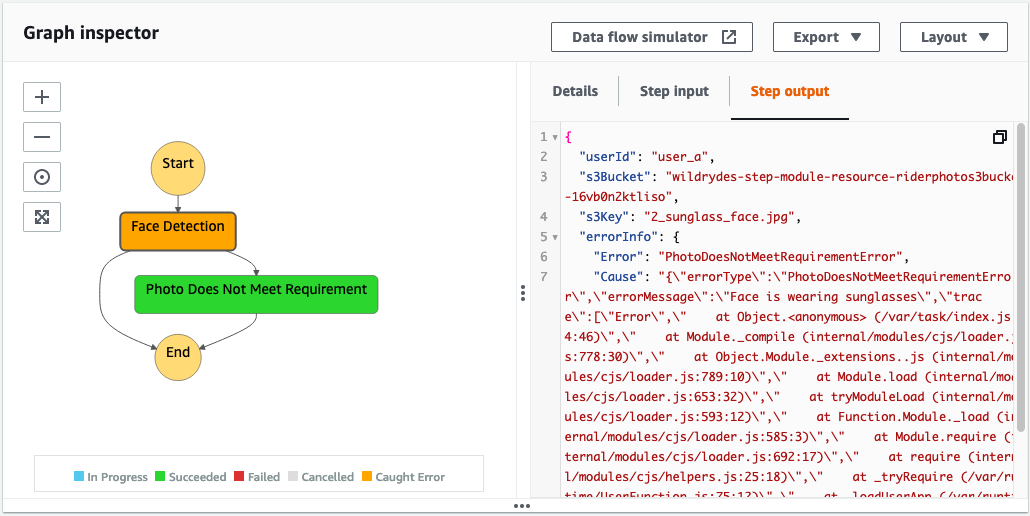
You can explore each step, the inputs passed to that step, and the output of that step in real-time by using the “Graph Inspector.” Just click on each state during or after the execution to explore what you can learn from this handy feature.
✅ Congratulations! You have now built, and tested the basic functionality for our rider application workflow. In the next sections, we’ll add additional features to make this process more robust and meet more of our requirements.